
To many, when you say email, it only refers to Gmail. Such is the user base of this great service from Google, that we often forget the pioneering acts of hotmail, yahoo mail etc. in getting the email service free of cost during the early phase of its inception. Since, its humble launch through invite in 2004, the Gmail has evolved from being a bland mail service, to one that offers value-added features to ensure that the lead in feel-good factor is retained.
Here, we will discuss on 15 Gmail inbox tips that you will fall in love with, something that will make your mailbox more organized and your life easier.
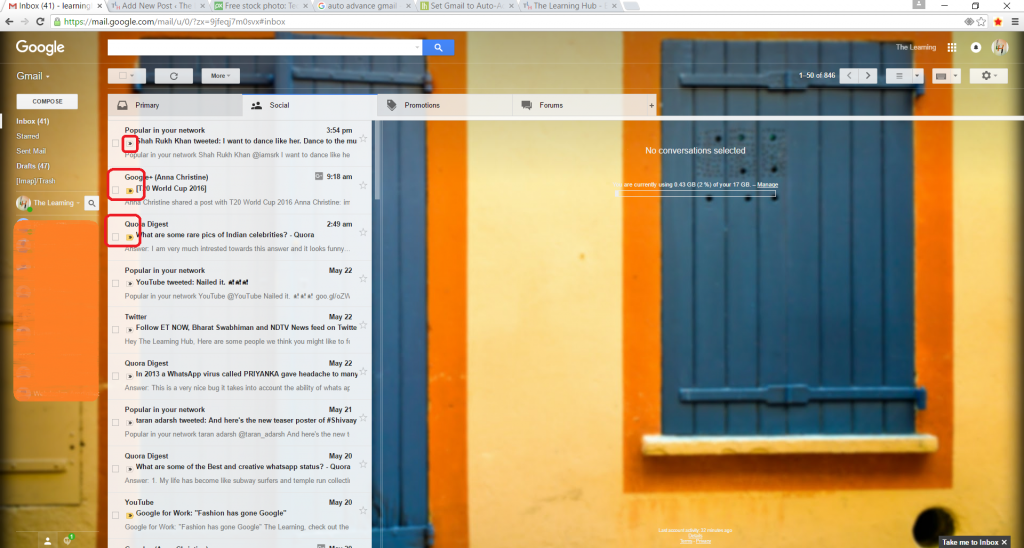
1. Filters to automatically segregate certain messages

One of the most loved features in the Gmail was its huge storage space, often called as mailbox size. However exciting this may seem to be, the flip-side is that your mailbox will be filled with a lot of mails since you do not bother to delete them. This can lead to accumulation of lot of mails to such an extent that your important mails may be difficult to find. Gmail has addressed this concern by letting you filter similar emails (messages). Once you open an email, you have to click “More” at the top right side of the mail and select “Filter messages like these”. A drop-down menu will come up that would let you filter all messages that are similar to the current mail.
2. Smart keyboard shortcuts

Gmail has a set of shortcut that are already activated. These include:
- Using arrow keys to move the pointer to messages, label or the compose button, once selected you can hit enter to activate it.
- Using the n key to move to the next message in a thread and p key to move to the previous. Pressing enter to open or collapse the message view.
- Navigation in the compose window:-
- Ctrl + . moves the cursor to the next window.
- Ctrl + , moves the cursor to the previous window
- Ctrl + Shift + c moves the cursor to the cc box
- Ctrl + Shift + b moves the cursor to the Bcc box
- Ctrl + Shift + f moves the cursor to the From field, if you have configured additional mailboxes
- Shift + Esc moves the cursor to the main Gmail window
Besides the above, you can turn on additional Keyboard Shortcuts by clicking the Gear icon, selecting Settings and selecting “Keyboard Shortcuts” on followed by Save Changes. This would enable you another set of easy keyboard shortcuts like the ones listed below:-
- c lets you compose a new message
- Shift + c composes a message in a new window
- d composes message in a new tab
- / moves your cursor to the search box
- k moves your cursor to the more recent conversation
- j moves your cursor to the next oldest conversation
- ` moves the cursor to the next inbox section
- ~ moves the cursor to the previous inbox section
- o or Enter key opens the conversation
- u refreshes the page and returns to inbox view
- e archives the message
- m archives the current conversation and all future messages are not listed in the inbox unless you are in the To or cc field.
- x automatically selects and checks a conversation for further action
- s adds or removes a star to a conversation or message
- + mark as important for Priority Inbox
- – mark as unimportant for Priority Inbox
- ! report the message as spam and remove it from the conversation list
- r replies to the message
- Shift + r replies to message in a new window in the conversation view
- a replies to all recipients of the message
- f forwards the message while Shift + f open the forward message in a new window
- Esc removes the cursor from the current input field
- Ctrl + s saves the draft
- # deletes the conversation
- L opens the label menu
- Shift + i mark the message as read
- Shift + u mark the message as unread
- v moves the conversation to another label
3. Display Density
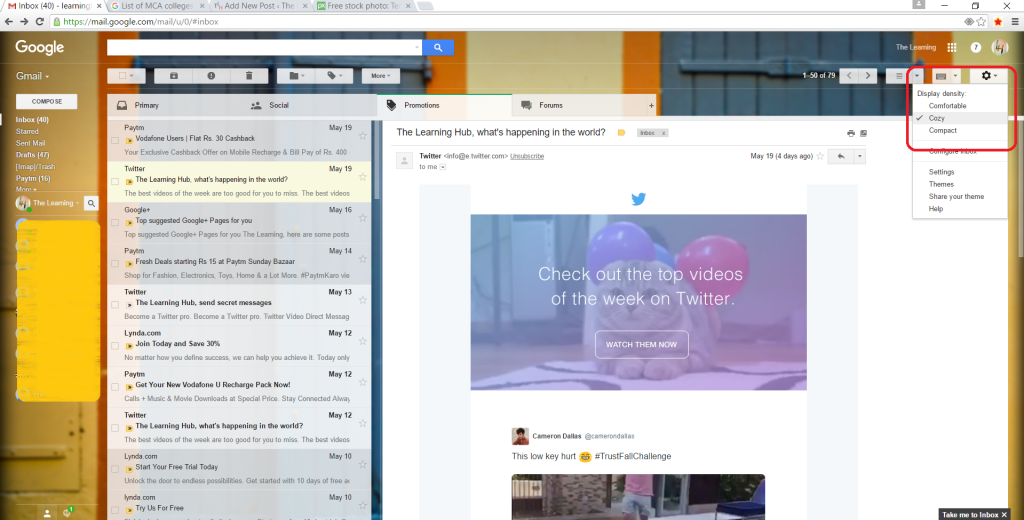
You can change the mailbox look and feel as per you wish by clicking on the settling icon and choosing the desired settings. The options available are Comfortable, Cozy and Compact. For touch enabled devices there is additional option – Touch enabled.
4. Customize the folder (Label) list

This feature of Gmail inbox lets you arrange your mails in a way that it will be less time consuming for you to find an email from a particular sender, say from your bank. To make this job easy, Gmail allows you to label or categorize mails into different folders.
5. Use Auto advance

When enabled in the Gmail Labs this feature helps you to automatically move on to the next email in line after you process an email. To enable go to Settings, and select enable for the setting ‘Auto advance’.
6. Advanced search
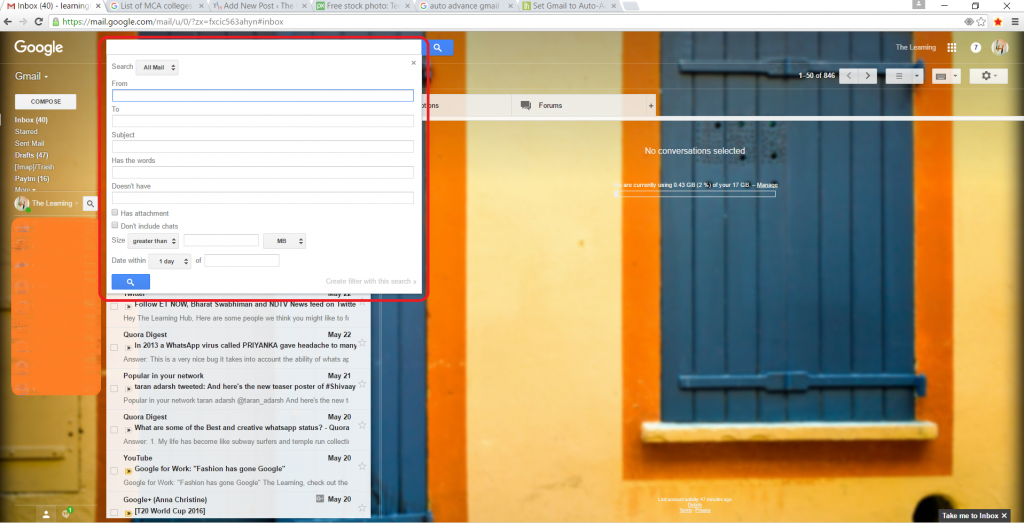
The advanced search feature in Gmail is worth a try. Find the arrow mark on the right side of the search box to list the advanced search menu. You get plenty of options to zero in on the message you were looking for. Apart from the regular From, To, Subject and keyword search, it also feature additional fields like “Doesn’t have”, “Has attachment”, “Size” and “Date”. The link “Create filter with this search” available in the advanced search can be used to search future mails or even the mails in the inbox using the same search criteria.
7. Set up desktop notification
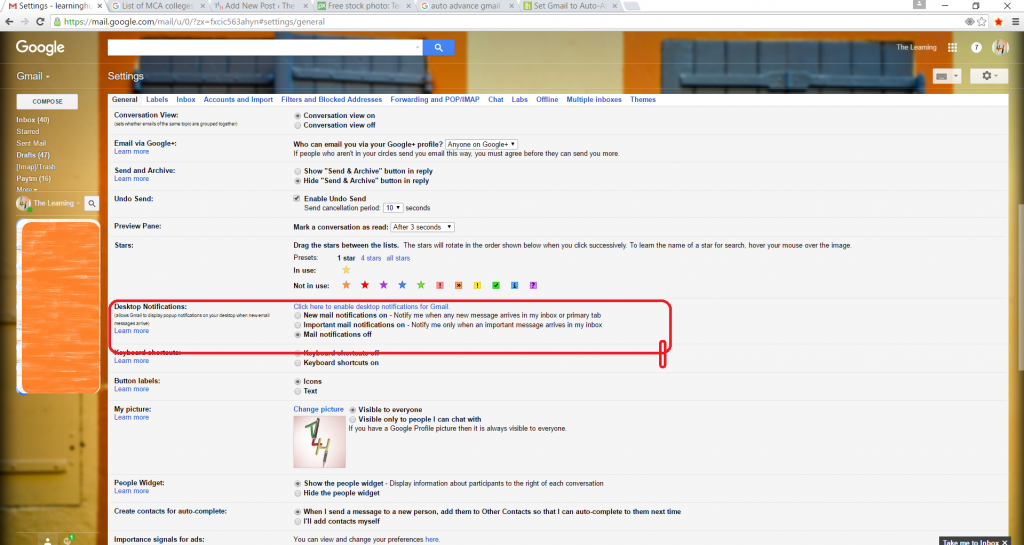
The Gmail in your browser can work similar to any desktop mail client, sending desktop notifications. You will receive notification pop-ups from the browser when a new message arrives. To enable this option, click on the gear icon on the top right side to open the settings page. Scroll down on the General Tab to find the Desktop Notification settings options. You can customize the notifications according to your preference – chat notification and email notification. After you make the changes, click Save.
8. Pick the inbox look of your choice
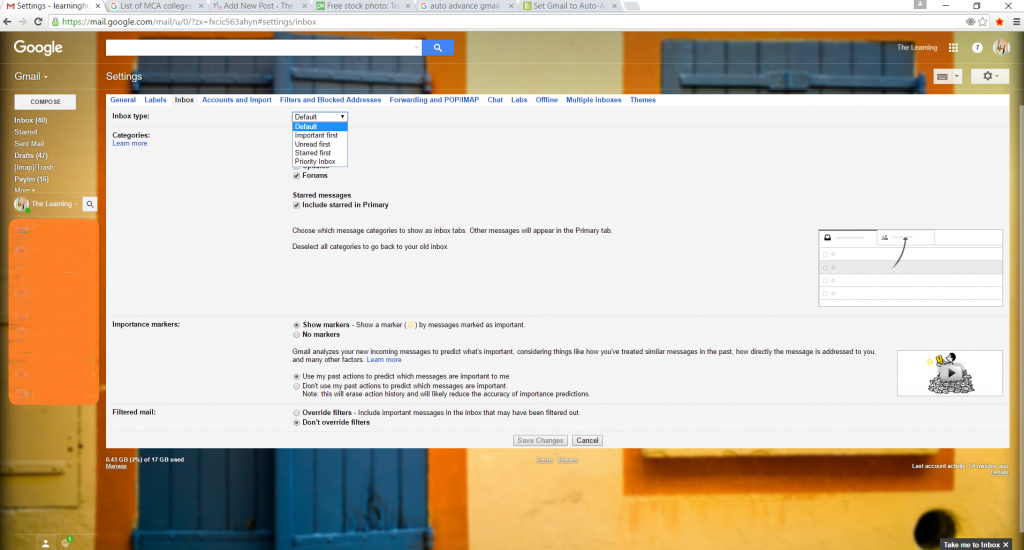
Gmail gives you the option to customize the order in which your mails should be displayed. You can change by going to the Settings page and selecting Inbox tab. Here in the ‘Inbox Type’ you have options to choose from ‘Default’, ‘Important First’, ‘Unread First’, ‘Starred First’ and ‘Priority Inbox’. Based on your wish to have the sequence in which the mails have to be displayed, you can choose the appropriate drop-down and click Save.
9. Undo Send
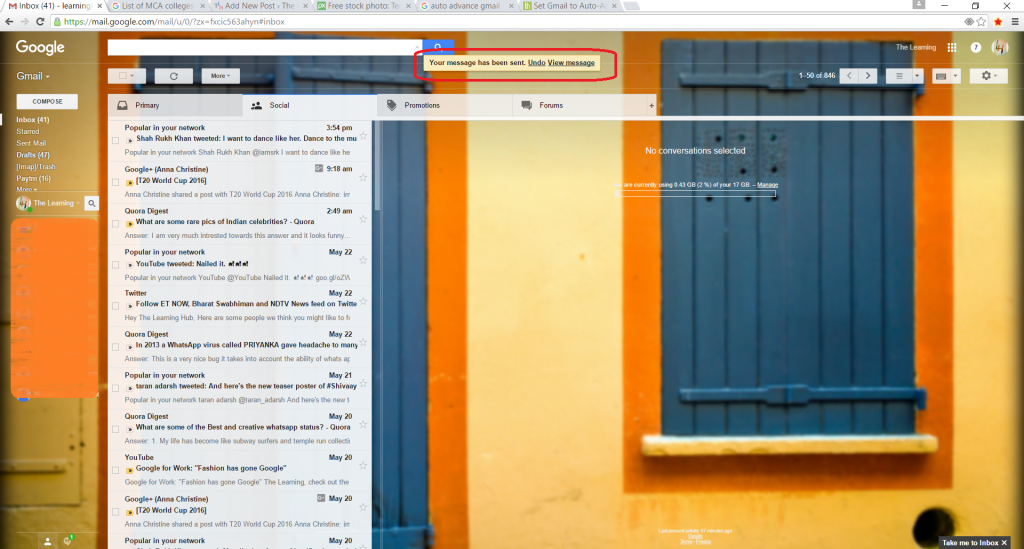
Quite a handy feature, the ‘Undo Send’ gives you the ability to cancel the sending of a mail for a specific period after the send button has been clicked. The options available are 5 seconds, 10 seconds, 20 seconds, and 30 seconds. This can be set by going to the General Tab in the Settings page and desired time duration from the drop-down for the ‘Undo Send’ setting.
10. ‘Select all’ option
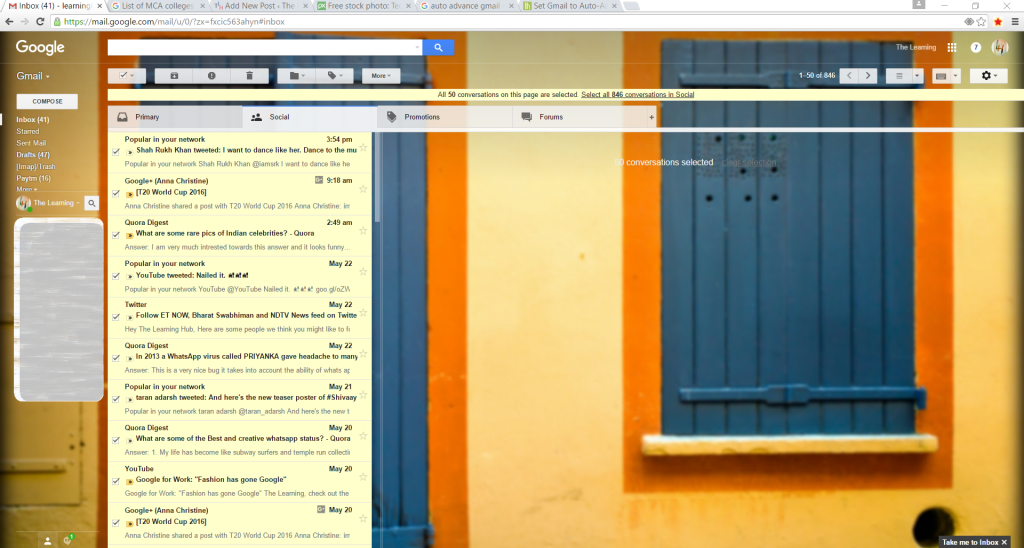
Gmail gives you the option to automatically mark multiple message and then decide on the action. The steps are simple.
- Open the folder (or the label) containing the messages and click the Select All link listed above the messages..
- Click the link that reads Select all [with the number] conversations in [current view].
11. Add a Preview Pane
If you enable the Preview Pane feature in Gmail labs, you can get to see a preview of the e-mail messages much similar to how you get in in Outlook. Enable this by going to Settings, select the Labs tab and scroll down to enable the Preview Pane. Click on Save Changes once done.
12. Notifications
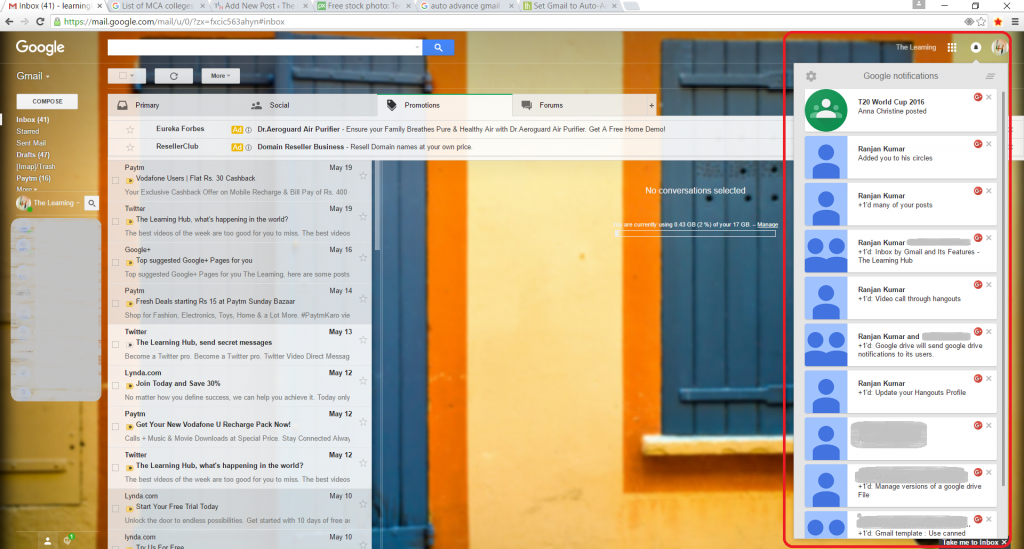
In the Gmail page, you can click on the small icon showing a bell in a circle, at the right top to see notifications from other services provided by Google like Google+, Calendar etc.
13. Import other POP3

Gmail allows you to configure other gmail accounts as well as external POP3 accounts to your present Gmail account. To do this, go to settings, click the “Accounts and Import” tab, and then click “Add a POP3 mail account you own” against the “Check mail from other accounts” section.
14. Marking as ‘read’ and ‘unread’

By enabling this feature in the Gmail Labs using the same steps as mentioned to enable “Preview Pane”, you can mark your email as ‘read’ or ‘unread’ by a single click.
15. Level indicators
This is an indicator which gives you the information about to how many people this mail was sent along with you. The yellow arrow which is present left to the email message in inbox has three markers. If the yellow marker has ‘>>’ symbol it means that the mail was sent only you. The ‘>’ symbol indicates that it was sent to more than one person and if there is no symbol it was sent to a mailing list. This feature has to be enabled from General tab in settings by selecting ‘show indicators’.
Besides the features listed above, there are others tips like “Canned Response” that can be enabled in Gmail Labs which would prove to be quite handy. Explore the world of Gmail and I am sure you would unearth many tip and tricks to make your life easy.


